How to Draw a Parrot Sitting on a Branch
A powerful, curved beak, an erect stance, robust legs, and clawed zygodactyl feet are all characteristics of parrots. Many parrots have bright colours, and some are multicoloured. In terms of length, they are the most diverse bird order. Seeds, nuts, berries, buds, and other plant material are the most significant components of most parrots' diets. A few species consume animals and carrion on occasion, but lories and lorikeets are specialised in eating on flower nectar and soft fruits. Almost all parrots nest in tree hollows (or in captivity, nest boxes) and lay white eggs from which altricial (helpless) babies hatch. Let us learn How To Draw Parrot For Kids in this article below.
How To Draw Parrot For Kids
You may use these methods to design a realistic-looking Parrot or an animated Parrot. Each step is supported by clear images that will act as a visual aid as you follow the directions. We're confident that whether you're a beginner or a seasoned artist, you'll be able to follow these instructions with ease. Furthermore, you may add your own flair and improvise at any stage. Feel free to mix and match colours to personalise and make your artwork one-of-a-kind. Allow your imagination to run wild and your creativity to soar. So, choose your favourite drawing tool and go to work!
Today we will learn how to draw a Parrot which is easy and enjoyable. This would be a very simple Parrot drawing that can be used as a learning stage to draw a professional sketch. Your biggest limitation is your creativity. Start with this simple Parrot bird diagram and work your way up to see what other ideas you can come up with. Let's begin by taking a look at some of the simple art supplies we'll be using today.
Materials required:
- Drawing paper
- Sharp Pencil
- Eraser
Step 1: Draw the head
We will first start by drawing the head of the parrot. For this, draw a semi-circle. Now draw a wavy line starting from the inside on the lower end. Extend this line to make it longer. On the top end, draw a small curve on the inside of the semi-circle. In the centre of the semi-circle, we will draw the eyes. For this, draw two circles one inside the other. Using your pencil, colour in the inner circle. This will make the eye of the parrot. Now we will draw the beak. On the lower part of the head, draw the beak. Parrots have a long sharp and curved beak. So keep that in mind while drawing it.

Step 2: Draw the body
Now that the head of the parrot is ready, we will move on to draw the body of this bird. First, elongate the ends of the semi-circle using freehand lines. On either side, draw a bulgy curve. Right below the top curve, draw another curve bent in the opposite direction. This makes the body of the parrot.

Step 3: Draw the feather and the legs
Join the top two curves using multiple curved lines. This will give your parrot a feather. For the legs, draw four lines next to each other. Leave more space between the second and the third line. This will make two legs of the bird.

Step 4: Draw the claw
The parrot we are drawing is sitting on a branch. So we will draw the branch and then the claw of the parrot. On the lower part of the paper, draw two lines one below the other. These lines must be close to the parrot's legs. Now we will draw the claw. Draw two claws on each foot. Also, draw nails on each of them.

Step 5: Add feathers
Now we will add feathers and detailing to the parrot. Below the first feather drawn, draw two lines. From here, draw a 3-like shape towards the right. Randomly draw lines over the parrot for the details. Refer to the image below to know how your parrot looks at this stage.

Step 6: Draw the tail
When a bird sits, the feathers are closed which looks like the tail. Drawing this is very easy, yet very important. Your diagram cannot be complete without this feature. For this, elongate the two lines used to make the body. Extend it till the end of the paper.

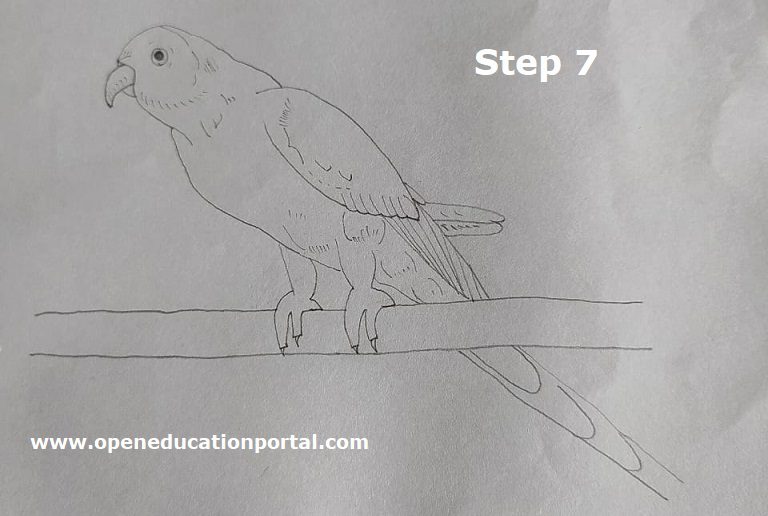
Step 7: Detail the tail
We will add a few semi-ovals on the tail feather. Starting from below the branch, keep drawing one below the other until the end of the tail. If you wish, you can also close the tail feather using this curve. We have left it open. If you have a lot of white space left, we recommend you to close the tail feather.
Step 8: Finishing
We have now completed drawing the parrot. Just add a few lines on the curves made in the parrot's tail feather. Your drawing is ready. Refer to the image below to clearly understand how your diagram needs to look after it is completed. You can also use colours to fill in your parrot diagram. Use your creativity and enhance your drawing.

Other Drawings:
- Easy Way to Draw a Bird
- How to Draw a Car
- How to Draw a Unicorn Girl
- Easy Steps to Draw a Ship
- How to Draw a Dog
- How to Draw a Fish
- Guide on How to Draw a Kidney
- How to Draw Stomach
- How to Draw Rat
- Draw a Rabbit Easily
- How to Draw a House for Kids
- How to Draw a Peacock Easy
- Easy Shark Drawing
- How to Draw a Lion for Kids Easy
- How to Draw a Fish
- Easy Way to Draw a Dolphin
Hope you have found all the information required about How To Draw Parrot For Kids. You can find all such information in various drawings on our website. If you have any queries or questions, do let us know in the comment section below. Make sure to draw this and send it to us. Send this article to your friends and family and let them know How To Draw Parrot For Kids.
How to Draw a Parrot Sitting on a Branch
Source: https://www.openeducationportal.com/how-to-draw-parrot-for-kids/
0 Response to "How to Draw a Parrot Sitting on a Branch"
Post a Comment